for manual method
http://www.nextofwindows.com/making-a-bootable-windows-to-go-usb-device-with-windows-8-1/
Making A Bootable Windows To Go USB Device with Windows 8.1
Windows To Go is a feature only in Windows 8 that enhances the mobility of Windows. Like its name says, it puts the whole Windows 8 system with data onto a single USB storage device to make it as a complete mobile operating system that you can boot it up on any of Windows-ready computers, regardless of the running operating system.

In Windows 8.1, Microsoft enhances this cool feature to make it even better by enabling Windows Store access, allowing to download and install apps onto the Windows To Go drive right from the network. It truly makes Windows To Go a workable solution for mobile use.
Building a Windows To Go USB device for Windows 8.1 is also not so difficult. It’s done in the steps exactly like what we explained in Windows 8. In case you missed, let’s take look again.
Things we need
There are a few things we need to prepare before starting building Windows To Go drive.
- A 16GB or up USB devices, either flash drive or external hard drive. The larger storage the drive has, the better. It’s also worth mentioning that the performance on an external HD is much better than on a flash drive.
- A Windows 8.1 ISO image file. What we really need here is to access to a file named install.wimlocated in \sources folder. You can mount the 8.1 Image file in Windows 8, browse through \sources folder in Windows Explorer, and copy install.wim file to a convenient location, for example, c:\temp folder.
- The ImageX.exe file from Windows 7 Automated Installation Kit. For your convenient, you can download from this link directly to save your time. Just right-click the link and choose Save As… to the same folder you have saved install.wim file earlier.
- Last, you will need a PC that runs Windows.
That’s all we need. And let’s start building your very first Windows To Go drive.
3 Steps to go
Step 1: prepare the USB drive to make it bootable
Open Command Prompt Window in Admin (press Win+X and select Command Prompt (admin) on Windows 8), type diskpart, and press enter.
diskpart>list diskdiskpart>select disk n (make sure replacing n with the number shown from the last step)diskpart>cleandiskpart>create partition primarydiskpart>format fs=ntfs quickdiskpart>activediskpart>assigndiskpart>exit
That’s it. You now have a device that’s ready to put Windows 8 image on.
Step 2: use ImageX to apply the image
In the same Command Prompt window that has the Admin rights, navigate to the location that stores both ImageX.exe and Install.wim files, and type the following command (Figure 1):
ImageX /apply install.wim 1 h:\
Assume that H: drive is the drive for the USB device.

Figure 1 – use ImageX to apply image file to USB
This step may take at least 30 minutes to finish, depending on what kind of USB device you are using.
Step 3: apply the boot record
In the same Command Prompt window, type the following command to apply the Windows 8 boot record to the device (Figure 2):
bcdboot.exe h:\windows /s h: /f all
Again, H: drive is the drive for the USB device.
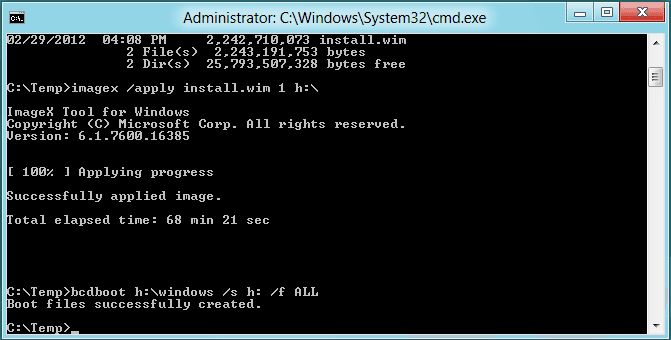
Figure 2 – apply boot record
That’s it.
Now, reboot your computer and select Boot to USB from the boot option and complete the final setup to get your Windows To Go ready.
/header photo credit: Technodify/
No comments:
Post a Comment