Sunday, December 06, 2015

Simplest way to view Windows 10 product-license-key-ID

Option Explicit

Dim objshell,path,DigitalID, Result
Set objshell = CreateObject("WScript.Shell")
'Set registry key path
Path = "HKLM\SOFTWARE\Microsoft\Windows NT\CurrentVersion\"
'Registry key value
DigitalID = objshell.RegRead(Path & "DigitalProductId")
Dim ProductName,ProductID,ProductKey,ProductData
'Get ProductName, ProductID, ProductKey
ProductName = "Product Name: " & objshell.RegRead(Path & "ProductName")
ProductID = "Product ID: " & objshell.RegRead(Path & "ProductID")
ProductKey = "Installed Key: " & ConvertToKey(DigitalID)
ProductData = ProductName & vbNewLine & ProductID & vbNewLine & ProductKey
'Show messbox if save to a file
If vbYes = MsgBox(ProductData & vblf & vblf & "Save to a file?", vbYesNo + vbQuestion, "BackUp Windows Key Information") then
Save ProductData
End If

'Convert binary to chars
Function ConvertToKey(Key)
Const KeyOffset = 52
Dim isWin8, Maps, i, j, Current, KeyOutput, Last, keypart1, insert
'Check if OS is Windows 8
isWin8 = (Key(66) \ 6) And 1
Key(66) = (Key(66) And &HF7) Or ((isWin8 And 2) * 4)
i = 24
Maps = "BCDFGHJKMPQRTVWXY2346789"
Do
Current= 0
j = 14
Do
Current = Current* 256
Current = Key(j + KeyOffset) + Current
Key(j + KeyOffset) = (Current \ 24)
Current=Current Mod 24
j = j -1
Loop While j >= 0
i = i -1
KeyOutput = Mid(Maps,Current+ 1, 1) & KeyOutput
Last = Current
Loop While i >= 0
keypart1 = Mid(KeyOutput, 2, Last)
insert = "N"
KeyOutput = Replace(KeyOutput, keypart1, keypart1 & insert, 2, 1, 0)
If Last = 0 Then KeyOutput = insert & KeyOutput
ConvertToKey = Mid(KeyOutput, 1, 5) & "-" & Mid(KeyOutput, 6, 5) & "-" & Mid(KeyOutput, 11, 5) & "-" & Mid(KeyOutput, 16, 5) & "-" & Mid(KeyOutput, 21, 5)


End Function
'Save data to a file
Function Save(Data)
Dim fso, fName, txt,objshell,UserName
Set objshell = CreateObject("wscript.shell")
'Get current user name
UserName = objshell.ExpandEnvironmentStrings("%UserName%")
'Create a text file on desktop
fName = "C:\Users\" & UserName & "\Desktop\WindowsKeyInfo.txt"
Set fso = CreateObject("Scripting.FileSystemObject")
Set txt = fso.CreateTextFile(fName)
txt.Writeline Data
txt.Close
End Function
I like this simple vbs program and also on bonus tips
to save the text file as vbs

but too bad can not attach vbs 


How to view your product key in Windows 10, Windows 8 and Windows 7

If you lost or forgot where you had stored your Windows product key, I have a solution for you. Today we will see how a simple VBS script can be used to show us the product key of an installed copy of Windows 10, Windows 8 or Windows 7. It is a simple solution to extract your product key from the OS installed on your PC without using any third party software. Here we go.

Actually, earlier I posted a similar solution which used PowerShell. but many users complained that it fails for them. PowerShell might require additional user skills and extra tweaks to run unsigned cmdlets.
Compared to PowerShell, this VBScript solution is almost perfect. All you need to do is to just click the file. To view your Windows 10 product key
  1. Open Notepad.
  2. Copy and paste the following text into the Notepad window
    Option Explicit     Dim objshell,path,DigitalID, Result   Set objshell = CreateObject("WScript.Shell")  'Set registry key path  Path = "HKLM\SOFTWARE\Microsoft\Windows NT\CurrentVersion\"  'Registry key value  DigitalID = objshell.RegRead(Path & "DigitalProductId")  Dim ProductName,ProductID,ProductKey,ProductData  'Get ProductName, ProductID, ProductKey  ProductName = "Product Name: " & objshell.RegRead(Path & "ProductName")  ProductID = "Product ID: " & objshell.RegRead(Path & "ProductID")  ProductKey = "Installed Key: " & ConvertToKey(DigitalID)   ProductData = ProductName  & vbNewLine & ProductID  & vbNewLine & ProductKey  'Show messbox if save to a file   If vbYes = MsgBox(ProductData  & vblf & vblf & "Save to a file?", vbYesNo + vbQuestion, "BackUp Windows Key Information") then     Save ProductData   End If        'Convert binary to chars  Function ConvertToKey(Key)      Const KeyOffset = 52      Dim isWin8, Maps, i, j, Current, KeyOutput, Last, keypart1, insert      'Check if OS is Windows 8      isWin8 = (Key(66) \ 6) And 1      Key(66) = (Key(66) And &HF7) Or ((isWin8 And 2) * 4)      i = 24      Maps = "BCDFGHJKMPQRTVWXY2346789"      Do          Current= 0          j = 14          Do             Current = Current* 256             Current = Key(j + KeyOffset) + Current             Key(j + KeyOffset) = (Current \ 24)             Current=Current Mod 24              j = j -1          Loop While j >= 0          i = i -1          KeyOutput = Mid(Maps,Current+ 1, 1) & KeyOutput          Last = Current      Loop While i >= 0       keypart1 = Mid(KeyOutput, 2, Last)      insert = "N"      KeyOutput = Replace(KeyOutput, keypart1, keypart1 & insert, 2, 1, 0)      If Last = 0 Then KeyOutput = insert & KeyOutput      ConvertToKey = Mid(KeyOutput, 1, 5) & "-" & Mid(KeyOutput, 6, 5) & "-" & Mid(KeyOutput, 11, 5) & "-" & Mid(KeyOutput, 16, 5) & "-" & Mid(KeyOutput, 21, 5)             End Function  'Save data to a file  Function Save(Data)      Dim fso, fName, txt,objshell,UserName      Set objshell = CreateObject("wscript.shell")      'Get current user name       UserName = objshell.ExpandEnvironmentStrings("%UserName%")       'Create a text file on desktop       fName = "C:\Users\" & UserName & "\Desktop\WindowsKeyInfo.txt"      Set fso = CreateObject("Scripting.FileSystemObject")      Set txt = fso.CreateTextFile(fName)      txt.Writeline Data      txt.Close  End Function
  3. Save the text above to a file with the ".vbs" extension on the Desktop.
    Bonus tip: To make sure that you saving the file correctly with the ".vbs" extension, you can type its name enclosed in double quotes, for example, "BackupWindowsKey.vbs".
    backup windows product key Windows 10
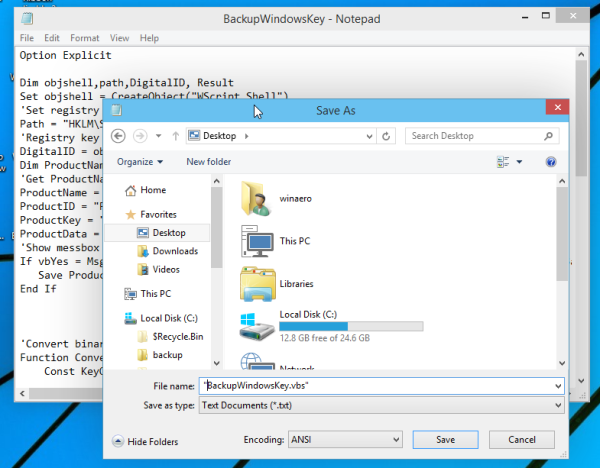
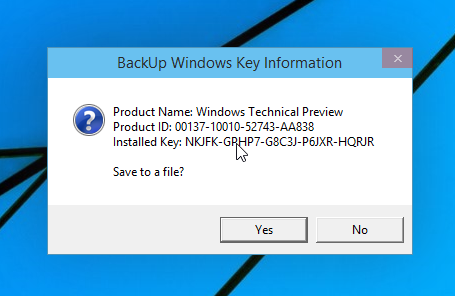
  4. Now open your BackupWindowsKey.vbs file
  5. Voila, you product key is displayed on the screen!
    show Windows 10 product key
I tested this trick on Windows 7, Windows 8 and Windows 10. It works flawlessly in all mentioned operating systems.

Saturday, December 05, 2015

SuperSU on Remix

the new SuperSU
is put under the setting menu

there is printing menu too


Android OS - Zygote, Dalvik VM to Android_Runtime

below lot of concept - only heard but never understand well

Android OS - Processes and the first init process Zygote

This is first lesson on Android
But most of time it is running in the background
as 


and I look into

Dalvik is a discontinued[1] process virtual machine (VM) in Google's Android operating system in Android 4.4

 In the next major Android release, Android 5.0 "Lollipop", Dalvik was entirely replaced by ART.[8]

So I am ignorance as I every time still clear the Dalvik Cache


Lollipop did not totally abandon dalvik cache. All it did it is to write pre compiled files to dalvik folder when installing while back in KitKat the system did not compile apps during installation but compile them just before them run (JIT). If you somehow delete/cleared all/some cached dalvik files in lollipop, system will try to re-compile the corresponding app so that you don't have to compile before they run.

Whenever an app updates via google play system compiles it during installation. However, when apps are updated via system update (Odin, ZIP flashing, OTA,you name it) , system will recompile the new apps which is why the first boot of lollipop takes so much time ( It is compiling all upgraded app!!).

Because TiBackup does not compile apps when restoring them, when you try to run the restored app, lollipop will try to find the pre-compiled file under dalvik cache directory but the correct one is not there. Therefore the app will not run properly. This is why after TiBackup restore in lollipop, always clear dalvik cache and cache and reboot. The restored app will be compiled correctly after during rebooting~ The same applies to Zip/Odin flashing too.

install forest-LP kernel then ROM Remix later on N7000

after install root version 2.4

then found this

and finally got the kernel file (see below note and attachment)

then I run the CWM
and then 
run the Philz

then I run the kernel

then run remix

(the process freeze at detected ext4 ...)

but it run long to have the ROM

then press any key to continue

(philz is touch screen and actually dun need the Android 5 type buttons)

but forgot to run Gapps

so re-run second time remix 
and use the TK pico 

also forgot to use philz clean to install a new ROM

but i wipe cache and Dalvik/ART Cache

philz is cwm-non-touch-6.0.1.4-i9100 ?

the upgrading up to 90 files

Too bad Gapps still giving problem

Third try I use gapps-lp-20141109-signed.zip
but it seem to be for Android 5.0 only

anyway, I even clear the cache and davike again

so take out battery
and going to recovery

install super SU 3.1.3

then install remix
and TK gapps

now it is reduced to 85 upgrading

this time seem to be system fresh setup
but too bad wifi not good

so after login gmail and it stop at checking infor

so need to do another time tmr


PS:

E:\app N7000>dir
 Volume in drive E has no label.

 Directory of E:\app N7000

30/11/2015  10:32 PM    <DIR>          .
30/11/2015  10:32 PM    <DIR>          ..
30/11/2015  10:29 PM         1,891,956 cwm-non-touch-6.0.1.4-i9100.zip
30/11/2015  10:29 PM         1,440,776 Root_SuperSU.0.98-Busybox.1.20.2-signed.zip
30/11/2015  10:29 PM         1,440,718 Root_SuperSU.0.98.Only-signed.zip
30/11/2015  10:35 PM         1,358,054 recovery-clockwork-4.0.1.5-galaxys2.zip
30/11/2015  10:35 PM           883,259 Root_Busybox_1.20.2_Only_(No_SuperSU)-S2-Update3-signed.zip
30/11/2015  10:35 PM         2,078,648 Root_Superuser_3.1.3_Busybox_1.20.2-Update1-signed.zip
30/11/2015  11:41 PM       249,088,035 cm-Resurrection_Remix_LP_v5.4.3-20150428-n7000.zip
01/01/2000  12:33 AM             2,798 tk_gapps_log.txt
30/11/2015  11:42 PM       162,927,577 gapps-lp-20141109-signed.zip
15/11/2015  08:26 PM       114,947,323 tk_gapps-modular-pico-5.1.1-20150920-signed.zip
15/11/2015  05:49 PM       216,663,841 Resurrection-Remix-LP-v5.5.8-20151019-jfltexx.zip
01/12/2015  09:52 PM         6,704,381 Forest-LP-Kernel-V5.zip
01/01/2000  12:33 AM            52,683 tk_gapps_debug_logs.tar.gz
07/03/2015  09:34 PM            24,332 AnReboot-net.londatiga.android.anreboot-5-v1.3.apk
              14 File(s)    759,504,381 bytes
               2 Dir(s)  13,870,071,808 bytes free


E:\app N7000>dir/w
 Volume in drive E has no label.

 Directory of E:\app N7000

[.]
[..]
cwm-non-touch-6.0.1.4-i9100.zip
Root_SuperSU.0.98-Busybox.1.20.2-signed.zip
Root_SuperSU.0.98.Only-signed.zip
recovery-clockwork-4.0.1.5-galaxys2.zip
Root_Busybox_1.20.2_Only_(No_SuperSU)-S2-Update3-signed.zip
Root_Superuser_3.1.3_Busybox_1.20.2-Update1-signed.zip
cm-Resurrection_Remix_LP_v5.4.3-20150428-n7000.zip
tk_gapps_log.txt
gapps-lp-20141109-signed.zip
tk_gapps-modular-pico-5.1.1-20150920-signed.zip
Resurrection-Remix-LP-v5.5.8-20151019-jfltexx.zip
Forest-LP-Kernel-V5.zip
tk_gapps_debug_logs.tar.gz
AnReboot-net.londatiga.android.anreboot-5-v1.3.apk
              14 File(s)    759,504,381 bytes
               2 Dir(s)  13,870,071,808 bytes free

Windows 10 autologin

after format and fresh installation

during installation i by pass email
and choose enter local username but leave password blank

this create auto login


but I try to get office again
so has to login via hotmail
but find to key in password very troublesome

(so referral to Windows 7 autologin process)

so to get back auto login

i use new settings/
Accounts
Your Accounts


similarly, to set google chrome as default broswer
as in below


install five copies of free office

After using a new email (not only hotmail) to get new office 365
later I reinstall (fresh install)  windows 10

after that I cant do another office install except

to goto


and login on same email


and then I was able to use office 363 online


but anyone able to do via better way to install offline (standalone)
copy of Microsoft Office (other than using new email ID)
do let me know

PS: the other alternative is Kingsoft office


and using Google doc


onhax window 10 copy need not activate

USB HDD partition (at least 90Gb) needed for both as a system and a boot partition.

initially f: is 72Gb

+18G
increase to 90 then


What are system partitions and boot partitions?

The system partition is the primary partition that is used as the active boot partition. System partition must be located on the disk where the computer boots from. One disk can only have one active system partition. System partitions refer to disk volumes containing defined files for the boot of Windows. Files such as Ntldr, Boot.ini, Ntdetect.com, bootmgr and BCD. Under Windows, this partition cannot be formatted

The Boot partition is the partition where Windows is installed. It includes a Windows directory. Similarly with system partitions, under Windows, this partition cannot be formatted. 

Sunday, November 22, 2015

windows-10-pro-build-10547


Microsoft shutdown all windows 10 ISO download except
since build 10511

While WinToUSB can not do  enterprise for free trial version


so I will go for

but too slow
so I used onhax


but need to press few times to bypass the adv

the blue icon free download

also this may not be the latest build 


Fwd: Windows PowerShell Get-Help Get-Help -online as administator


I dun know and downloaded to install 

Get-Help

but actually just need to run 
>Get-Help Get-Help -online


to list of 
get-command check

https://technet.microsoft.com/en-us/library/hh849711(v=wps.630).aspx

Also

so it is better to run power shell ISE with help on the right
and also with run with administrator


as in 


this is require to run the script
Clear-Host
Write-Host "1 -&gt; Never check for updates (not recommened)"
Write-Host "2 -&gt; Check for updates but let me choose whether to download and install them"
Write-Host "3 -&gt; Download updates but let me choose whether to install them"
Write-Host "4 -&gt; Install updates automatically (recommended)"
Write-Host "Enter any character to exit"
Write-Host
switch(Read-Host "Choose Window Update Settings"){
       1 {$UpdateValue = 1}
       2 {$UpdateValue = 2}
       3 {$UpdateValue = 3}
       4 {$UpdateValue = 4}
       Default{Exit}
}
$AutoUpdatePath = "HKLM:\SOFTWARE\Microsoft\Windows\CurrentVersion\WindowsUpdate\Auto Update"
Set-ItemProperty -Path $AutoUpdatePath -Name AUOptions -Value $UpdateValue

PS: to change to administrator is


--
Tin KOH S. N.
+65       9663 9353
+86 136 0001 9353 

disable window 10 update auto


powershell

Clear-Host
Write-Host "1 -> Never check for updates (not recommened)"
Write-Host "2 -> Check for updates but let me choose whether to download and install them"
Write-Host "3 -> Download updates but let me choose whether to install them"
Write-Host "4 -> Install updates automatically (recommended)"
Write-Host "Enter any character to exit"
Write-Host
switch(Read-Host "Choose Window Update Settings"){
       1 {$UpdateValue = 1}
       2 {$UpdateValue = 2}
       3 {$UpdateValue = 3}
       4 {$UpdateValue = 4}
       Default{Exit}
}
$AutoUpdatePath = "HKLM:\SOFTWARE\Microsoft\Windows\CurrentVersion\WindowsUpdate\Auto Update"
Set-ItemProperty -Path $AutoUpdatePath -Name AUOptions -Value $UpdateValue


http://www.pctools.com/guides/registry/detail/1176/
Open your registry and find or create the key below.
Create the required DWORD values from table below:
Value: NoAutoUpdate


  • 0 - Enable Automatic Updates (Default)
  • 1 - Disable Automatic Updates
    Value: AUOptions
  • 2 - Notify for download and notify for install
  • 3 - Auto download and notify for install
  • 4 - Auto download and schedule the install
    Value: ScheduledInstallDay
  • 0 - Install every day
  • 1 to 7 - Install on specific day of the week from Sunday (1) to Saturday (7).
    Value: ScheduledInstallTime
  • 0 to 23 - Install time of day in 24-hour format
    Restart Windows for the changes to take effect.


  • The registry can be found in
    https://drive.google.com/file/d/0B2gSi3Jo8NCES09nSUNBdmUxMjA/view?usp=sharing


    how-remove-windows-old-folder


    1. Open Control Panel by swiping in from the right edge of the screen, tapping Search (or if you're using a mouse, pointing to the upper-right corner of the screen, moving the mouse pointer down, and then clicking Search), entering Control Panel in the search box, and then tapping or clicking Control Panel.
    2. In the Control Panel search box, type Admin, tap or click Administrative Tools, and then double-tap or double-click Disk Cleanup.
    3. If you're prompted to choose a drive, select the drive that you just installed Windows on, and then tap or click OK.
    4. In the Disk Cleanup dialog, tap or click Clean up system files.
      If you're again prompted to choose a drive, select the drive you just installed Windows on, and then tap or click OK.
    5. Select the Previous Windows installation(s) check box, and any other check boxes for the files you want to delete, and then tap or click OK.
    6. In the message that appears, tap or click Delete files.